
Adding custom styling to documents makes them look more professional. This blog post will take you through the process of making a Quarto extension to create a reusable custom template for good-looking PDFs. February 17, 2023 Quarto is an open-source scientific and technical publishing system that allows you to combine text with code to create fully reproducible documents in a variety of formats. One of those formats is PDF. The default outputs look reasonably good for academic articles, but if you’re making professional reports, a CV, or sending a letter - you probably want something that just looks a bit nicer. Before we begin, I do want to point out that PDFs are not accessible, and generally recommend using HTML documents instead. However, many places won’t yet accept HTML documents - especially when it comes to uploading documents online. So, we might have to stick with PDF for now.
Quarto extensions are used to modify and extend the behaviour of Quarto. Templates are just one type of Quarto extension.
Note that if you’re using or developing Quarto extensions, you will most likely need to be using at least version 1.2 of Quarto.
The template.qmd is the file that will be copied over to a new directory when a user chooses to use the template, as well as the extension. Template files are optional, but it makes it easier when starting a new file if the YAML has already been filled in for a user. In this case, it’s a .qmd file that’s (almost) the same as the default template you get if you do File --> New File --> Quarto Document but with the format specified as format: PrettyPDF-pdf to make sure Quarto looks for our extension. The PrettyPDF.tex file is where most of the work is being done, and is what I’ll explain in the rest of this blog post. It contains LaTeX code which will be included in the header of the document, and implements the styling that we want. The (optional) pagestyle.tex file contains an extra little bit of LaTeX that needs to be included before the body of the document (but not in the header). The (optional) logo.png file is the image that will be included in the final document in the top right corner. The _extension.yml file is where the extension specific information is stored. It looks a little bit like the YAML at the top of Quarto documents, in that it specifies the format (and any pre-set format options). But it also includes information on the extension - including the extension name, and the version number. For the PrettyPDF extension, it looks like this:
You can see where the PrettyPDF.tex and pagestyle.tex are referenced. These could be added directly in the template file, but it keeps the main .qmd YAML a bit tidier if they’re loading in the background, and uses the same pre-sets for all documents of this type. Let’s talk about that PrettyPDF.tex file in a bit more detail…
The first thing we need to do is load some LaTeX packages, that will allow us to implement the rest of the styling options.
Now we can set up the page geometry. Here we specify that we want the paper size to be A4, and increase the margin on the right hand side. This is because I want to add a coloured bar on the right hand side of the page, and need to make sure the text doesn’t overlap into that sidebar.
Let’s also define some colours using the xcolor package, which takes hex colours as input (crucially, not including the # symbol)! Defining colours at the start makes it easier to change colours later, and easier to match up different elements with the same colour. Here, I’ve defined three colours: light (which is a pale purple) that will be used for the aforementioned sidebar and code block background; highlight (which is a brighter purple) that will be used for links; and dark which will be used for text.
You could also define a colour for the page background but I’d recommend against that most of the time. Some people still print PDFs - and you don’t want to be the person who sends in their CV with a dark background colour and only half of gets printed because there’s not enough ink in the printer… So let’s get onto adding that sidebar! This LaTeX code adds a coloured bar (with the light colour) on the right hand side which spans the entire height of the page, and is 3cm wide.
If we want to add a logo in the (top right) corner, we can edit the above code instead to be:The second part of this LaTeX code, adds the file logo.png to the top right corner, 2.25cm from the side of the page, and is 1.5cm wide (which ensures it’s centered on the 3cm sidebar). Here, the file extension is relative to where the main .qmd file is after the extension has been installed by a user. Since I have a sidebar, I’d prefer if the page numbers were in that sidebar, rather than in the middle of the page (where they normally are by default). This LaTeX code defines a new page style that pushes the page number to the right hand side, and also increase how far it is from the bottom of the page.
To get this to work, we need to include \pagestyle
I also want to left align the title, subtitle, and author fields, since it looks better with the sidebar on the right:
Now we just need to change the fonts that are used. Here, I’ve used the Ubuntu font which I’ve downloaded and stored in the _extensions/Ubuntu directory. LaTeX has some built-in font rules, so here I’ve set the default sans serif font to be Ubuntu, as well as the main font. Again, the file paths here are relative to the main .qmd file that a user will be editing.
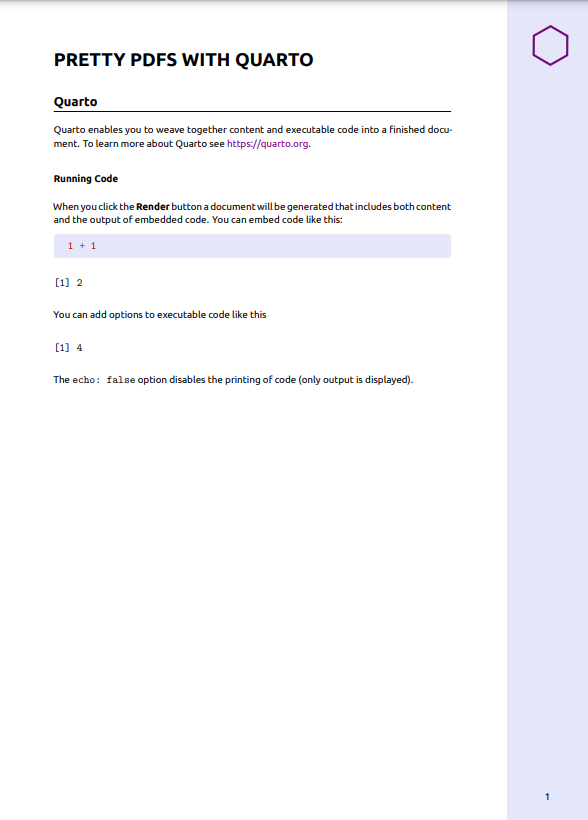
And that’s everything that’s in the PrettyPDF.tex file! This gives us a PDF that looks a bit like this:
You can download a copy of the template PDF here, and view the source code on GitHub.
If you want to use this extension in your own projects, please feel free to do so! You can install the extension using the command line: To install the Quarto extension, create a directory, and use the template file:
To use the extension in an existing project without installing the template file:Note that you will need to update the output format of your existing .qmd file to format: PrettyPDF-pdf to enable use of the extension. You can add any additional PDF options to the PrettyPDF-pdf using, for example:
Either replace the logo.png file in the _extensions directory with a new file of your choosing (with the same name), or change the file path on line 28 of PrettyPDF.tex to point to a different logo file. Note that the file path is relative to your .qmd file. You can remove lines 25-30, if you’d rather not have a logo at all.
Changing the coloursLines 14-16 of PrettyPDF.tex define three colours used in the template: light , dark , and highlight . Change the hex colours in these lines to update the colours. The light colour changes the sidebar and code block background colours. The dark colour changes the text colour, and the highlight colour changes the link colours.
There will almost certainly be some elements of the default Quarto PDF theme that I haven’t adjusted here, simply because I haven’t had the need to yet. Feel free to make your own adjustments!
Further resourcesIf you’re looking for more Quarto extensions, I’d highly recommend checking out the Awesome Quarto repository - it has links to lots of Quarto resources including talks, tools, examples, and articles.
If you want to know how to distribute your Quarto extension as part of an R package, instead of through GitHub, this blog post from Spencer Schien will be very useful.
This blog post from Meghan Hall gives some great tips for customising Quarto PDFs, including parameterised reports so you can change the styling of your report based on parameters, and your data.
Now you’re ready to go and create some beautiful looking PDFs with Quarto!
For attribution, please cite this work as:
BibLaTeX Citation@online, title = , date = , url = >